How to Flash Stock Rom In Samsung Galaxy A90, Flash Stock rom
What is ROM?
ROM to Android is abbreviated for Read Only Memory. A "ROM" is the operating system software that runs your Droid. It is stored in the “Read Only Memory” portion of the hardware on the Android smartphone and/or tablet. Android comes in two forms: Stock ROM and Custom ROM.
What is Stock ROM?
Stock ROMs are the ones which come by default in Android phones or tablets. These are customized versions of Android developed by manufacturers and carriers to let users stick to their devices with unique looks and features. The "out-of-the-box" smartphones are all shipped with stock ROM.
Main Advantages of Stock ROM
- Keep the warranty. Stock ROMs would not void your warranty of Android devices. One of the biggest reasons why users don't go for the custom ROMs is that rooting will immediately void your warranty. Installing a custom ROM needs to get a root access. Most of Manufacturers prohibit rooting or installing a custom Android version.
- Pre-installed apps. Android devices with stock ROMs usually come with lots of pre-installed apps. These apps sometime are good enough to attract customers such as music players, live wallpapers, app store, calendar, weather and so on. However, these pre-installed apps sometime are seldom used by users which are called bloatwares. In that, this advantage may turn into disadvantage.
- Premium Features. Just like the pre-installed apps, Stock ROMs also come with lots of premium features which are not available in custom ROMs. These features include home screen, font, launcher or app drawer. Devices which developed by different manufacturers shiped different premium features and apps.
How to Flash Stock Rom In Samsung Galaxy A90.
1st You Have to Download Some Files In your Windows Pc.
- Download Stock Rom For Samsung Galaxy A90.
- Download Adb And Fastboot driver's For Samsung Galaxy A90.
Begin Samsung Galaxy Flashing Process.
Connect your samsung Galaxy to Windows pc via Usb Cable
Step 1: Download and install device driver software on your computer.
Step 2: Download and extract the Stock ROM (Official/Original Firmware).
Step 3: Download and extract Odin on you PC.
Step 4: Boot your Samsung device into Download mode.
Step 2: Download and extract the Stock ROM (Official/Original Firmware).
Step 3: Download and extract Odin on you PC.
Step 4: Boot your Samsung device into Download mode.
Flash Samsung Galaxy A90 Stock ROM (Official/Original Firmware) via Odin
Step 1: Download and install device driver software on your computer.
Visit Samsung official website to find the correspondent driver software.
Google the driver software of your device. Download and then install it on you computer.
Download or update Kies, part of which will install or update drivers.
Once drivers are installed or updated, it is highly recommended that you restart your computer.
Step 2: Download and extract the Stock ROM (Official/Original Firmware).
 |
| Download Stock Rom For Samsung Galaxy A90 |
SamMobilemay be the best choice to download stock firmware of Samsung device. Or you can go to Samsung Updates, XDA Forum or Google to find the correspondent firmware of your device.
Click "Firmware" and enter your device model

Select country or type in certain info to filter, eg.Baseband version.
After downloading it (normally a compressed file), you need to extact/unzip it to certain location of your PC. The file types that Odin uses are *.bin,*.tar and *.tar.md5.

Find the file you have downloaded and then unzip it to Desktop.

You will find a *.md5 file after extracting.
Step 3: Download and extract Odin on you PC.
You can download Odin V3.10.7 directly from SamMobile. AndroidMTK is a fine alternative, it also offers a detailed list of Odin versions and download link. Or you can always Google "Odin download". After downloading it on your PC, extract it to Desktop or another location you'd prefer.

Odin zip file.
After extracting, right-click to "Open as Administrator". It may prevent certain issue from happening.
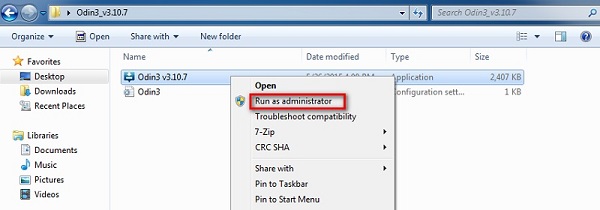
Run Odin as administartor is recommended.
Step 4: Boot your Samsung device into Download mode.
Follow these steps to enter Download Mode/Odin Mode
Power off your device
Press and hold Volume Down key, Home Key and Power Key
When your device vibrates, release Power key while keep holding the Volume Down key and Home key
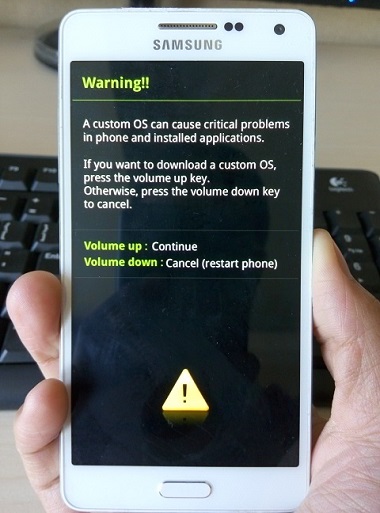
Warning before entering into download mode
Press Volume Up key to enter Download mode, which has a green robot figure and “Downloading… Do not turn off target!!)

Now you are in download mode.
Step 5: Connect your device to PC.
You device should be automatically recognized by Odin. At the lower-left of Odin interface, it should show a message that says "Added!" and in the meantime you should see a light-blue box at the ID:COM section stating "COM:3" (the number depend on which USB port you have plugged the device cable and is irrelevant).
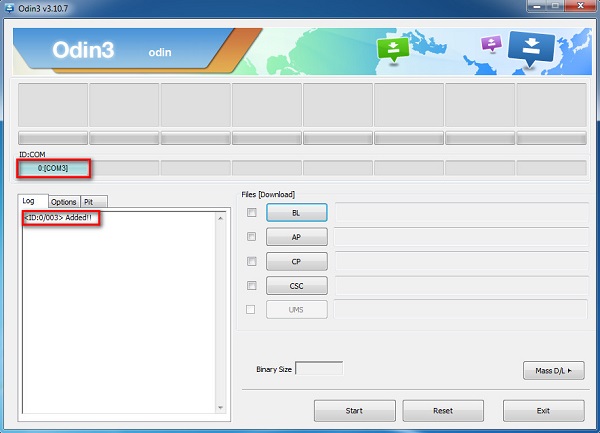
Device is connected to Odin.
Step 6: Click "PDA" or "AP" to add tar.md5 file that you have extracted and then "Start".
Whether it is "PDA" or "AP" depends on the version of Odin that you used. But the md5 file goes to either "PDA" or "AP".
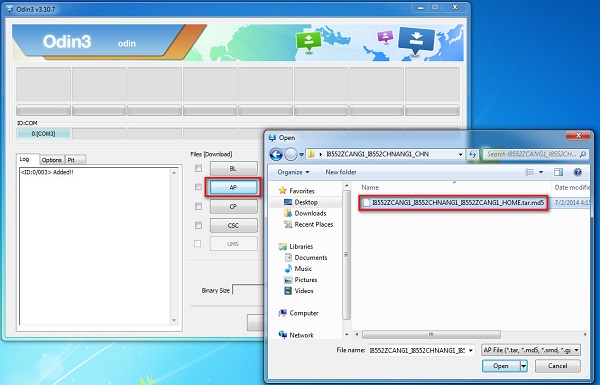
Add *.md5 to Odin.
After adding the file, click "Start" to begin the flashing process.
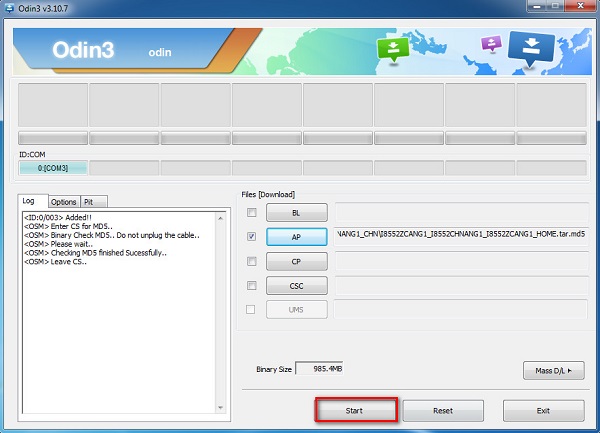
Click "Start" to flash.
WARNING DO NOT REMOVE OR OPERATE ON YOUR DEVICE UNTIL FINISHED OR FAILED IS SHOWED ON ODIN.
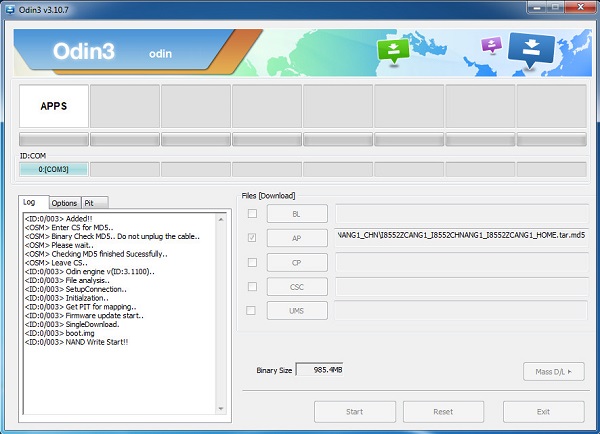
Ongoing flashing process. Do not remove your device.
When the flashing process is done and if everything goes well, you should see a big green box saying "RESET" or "PASSED" (depends on the version of Odin is used). By now, the device should be rebooted and it is safe to remove/unplug your device.

Flash succeeded.
If failed Then Comment Below We Will Contact You To solve Your Problem
Other Related Post's.
- How to Flash TWRP Recovery In Samsung Galaxy A90.
- How To Root Samsung Galaxy A90.
- How To Flash Stock Rom In Samsung Galaxy A90.
- How To Flash Custom Rom In Samsung Galaxy A90.
Comments
Post a Comment